This tutorial is from a session I conducted at NICAR 2026 in Indianapolis with Jerry Zremski: How we cover local elections with Datasette and SvelteKit and you can too.
Code Repo: https://github.com/amarton/voterguide-nicar
In this document, you’ll learn how we built a dynamic election guide using Datasette and SvelteKit. We designed this setup to support real reporting needs, not just demos or side projects.
This workflow is flexible. You can use it to build almost any data-driven news site that runs on a small database. Once the structure is in place, you can reuse it for new topics with minimal changes.
Datasette serves two roles. It acts as your main data repository, and it works as an API that delivers specific slices of data to the site as needed. You keep your data centralized and query it directly from the web.
SvelteKit handles the web side. It manages routing, makes API calls to Datasette and outputs the final HTML pages your audience sees. You don’t need separate tools for each step. Everything lives in one framework.
We used this workflow to build our 2024 Maryland school board election guide. Because the system is so adaptable, we’re using the same approach to cover other races this year with very little rework.
The data
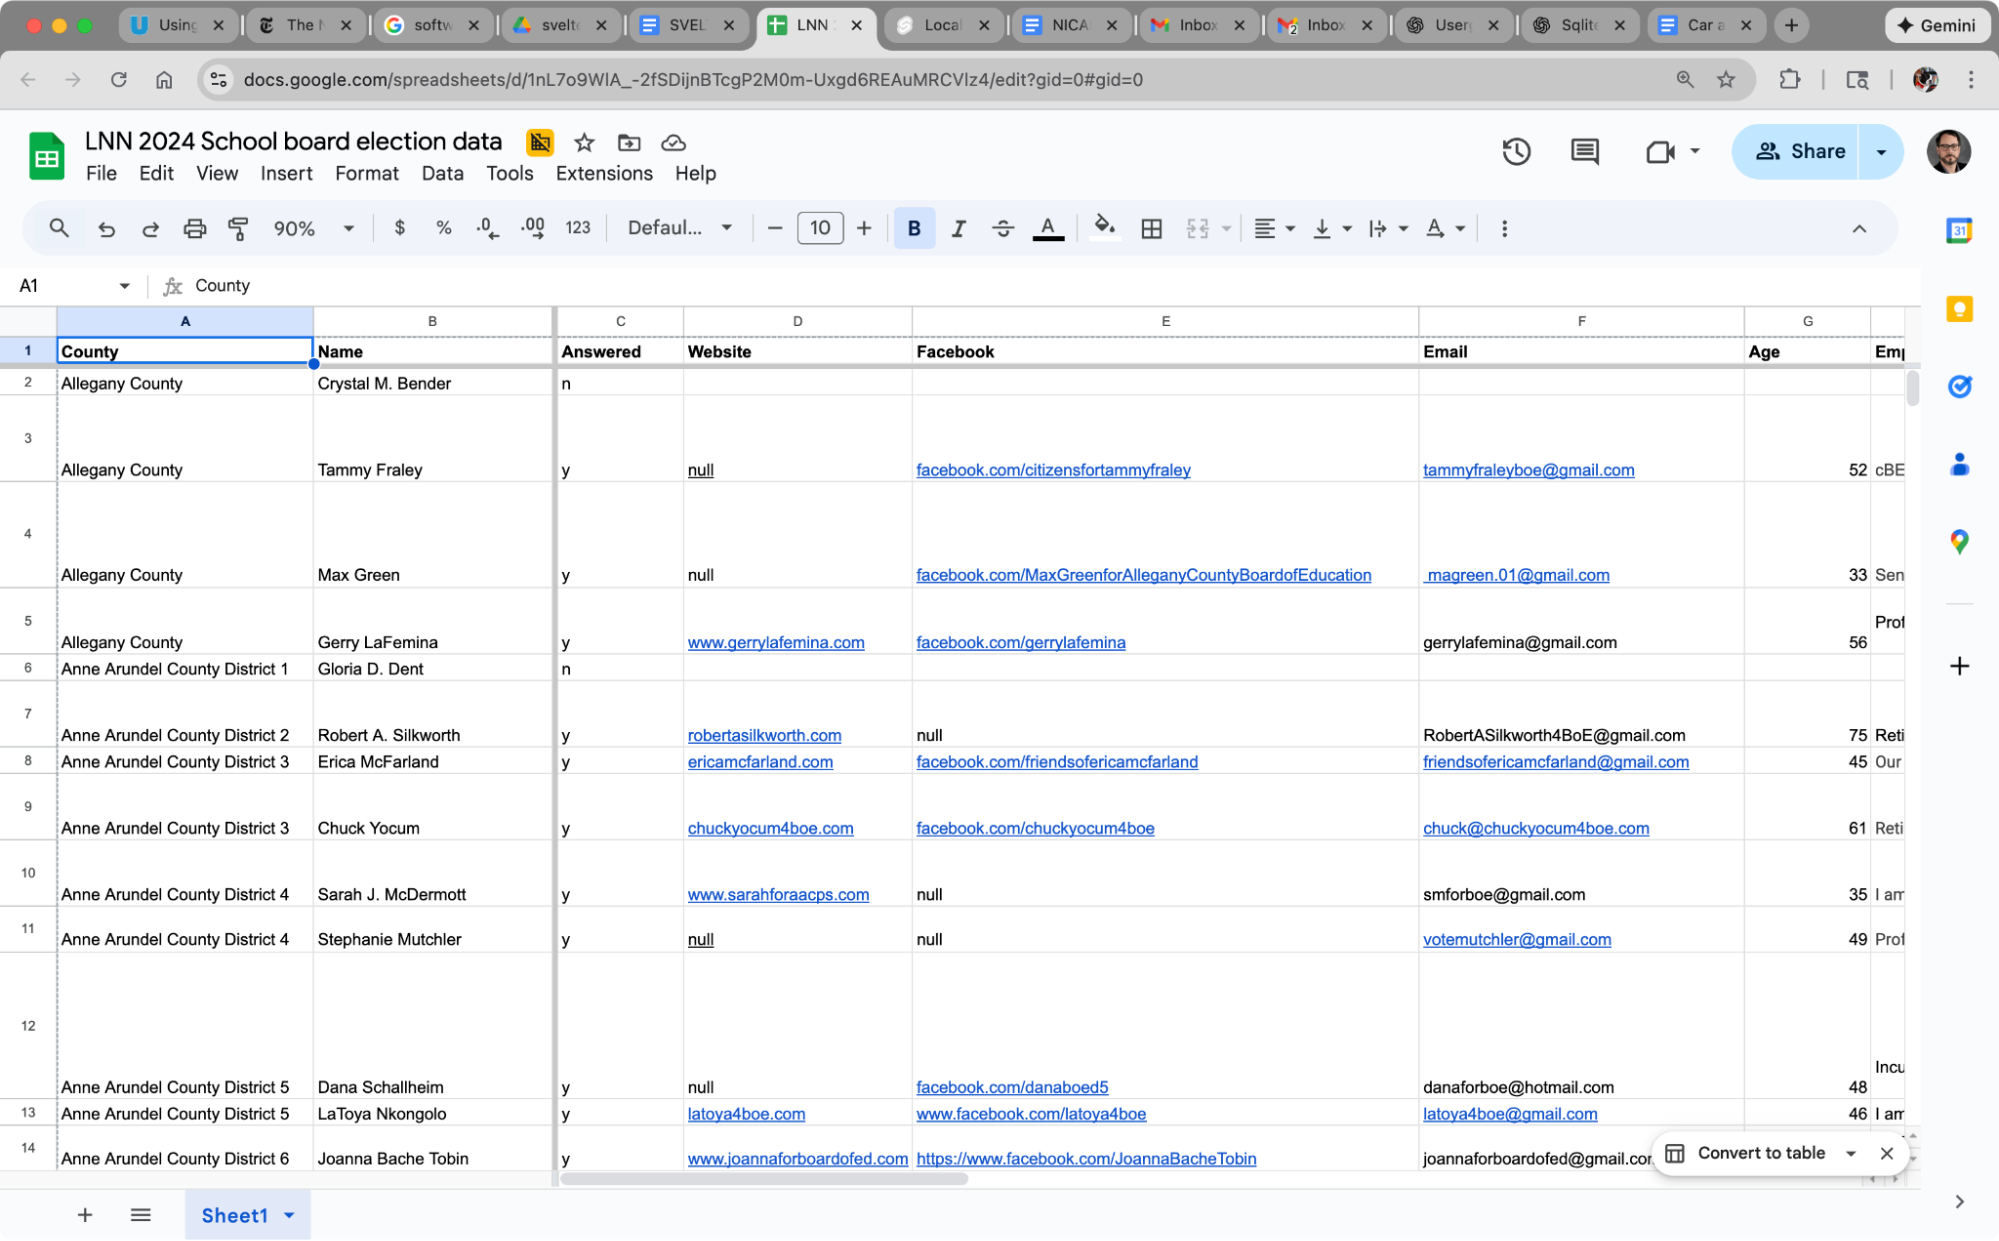
 One of the best parts of this workflow is that it starts where a lot of our work already happens: a spreadsheet. In our case, reporters filled out a Google Sheet using responses from a candidate survey.
Step 1: Create your spreadsheet
Build your spreadsheet to match the structure you want in your database. Each column should map cleanly to a field you’ll want to query later.
You should also create a short data-entry guide. Consistency matters. If you plan to filter or group by specific terms, everyone needs to enter those terms the same way. Here is an example of our spreadsheet:
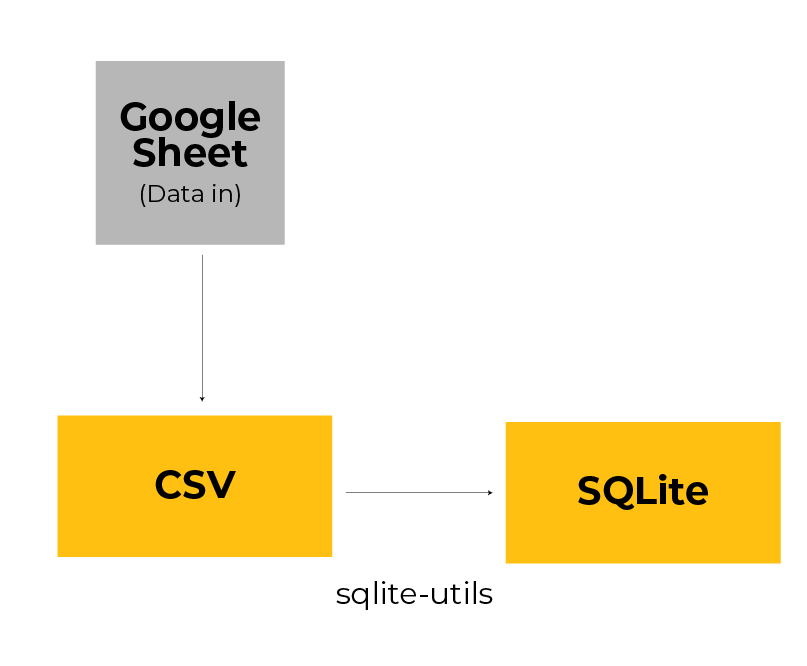
 Step 2: Export to CSV
Once the data is ready, export the spreadsheet as a CSV file. You can do this directly from Google Sheets or Excel.
Step 3: Turn the CSV into a SQLite database
Next, convert the CSV into a SQLite database. SQLite is a lightweight database that stores all your data in a single file. It’s fast, portable, and widely used for small to medium applications and data journalism projects.
The easiest way to do this is with a Python tool called sqlite-utils.
Here’s the basic command:
| $ sqlite-utils insert [DATABASE_NAME] [TABLE_NAME] [CSV_PATH] –csv -d |
|---|
You’ll need to decide three things:
[DATABASE_NAME]: the name of your database file[TABLE_NAME]: the name of the table inside the database[CSV_PATH]: the path to your CSV file
Here’s a real example. This command turns election-data.csv into a table called candidates inside a database called election.db:
| $ sqlite-utils insert election.db candidates election-data.csv –csv -d |
|---|
You can run this command again to update the database when your data changes. If you change the structure of the spreadsheet, delete the old database file first and rebuild it from the new CSV.
Datasette
What is Datasette?
Datasette is an open-source tool for publishing and exploring data stored in SQLite databases. It turns a database file into a website with a built-in interface and a powerful API. You don’t need to build custom endpoints or dashboards to get started. Datasette does that work for you.
At its core, Datasette reads your SQLite database and exposes the tables as web pages and JSON endpoints. You can browse the data in your browser, run SQL queries and link directly to filtered views. Every query you run also becomes an API endpoint you can call from another application.
Newsrooms use Datasette to publish datasets, power interactive stories and serve structured data to front-end frameworks. In this workflow, Datasette acts as the API that feeds the website.
You can see an example of and explore a Datasette database here.
Getting started with Datasette
You can find the full documentation on the Datasette website. It walks through installation, configuration, and deployment in clear, practical steps. You can install Datasette on your computer in a number of ways, see instructions here. I used homebrew and it was fairly straightforward.
SQLite to Datasette
Once you have a SQLite database file, you can launch Datasette with a single command and immediately explore your data in the browser. You don’t need to define schemas, write migrations, or build an API layer by hand.
You can use this command to launch Datasette locally:
| $ datasette path/to/database.db |
|---|
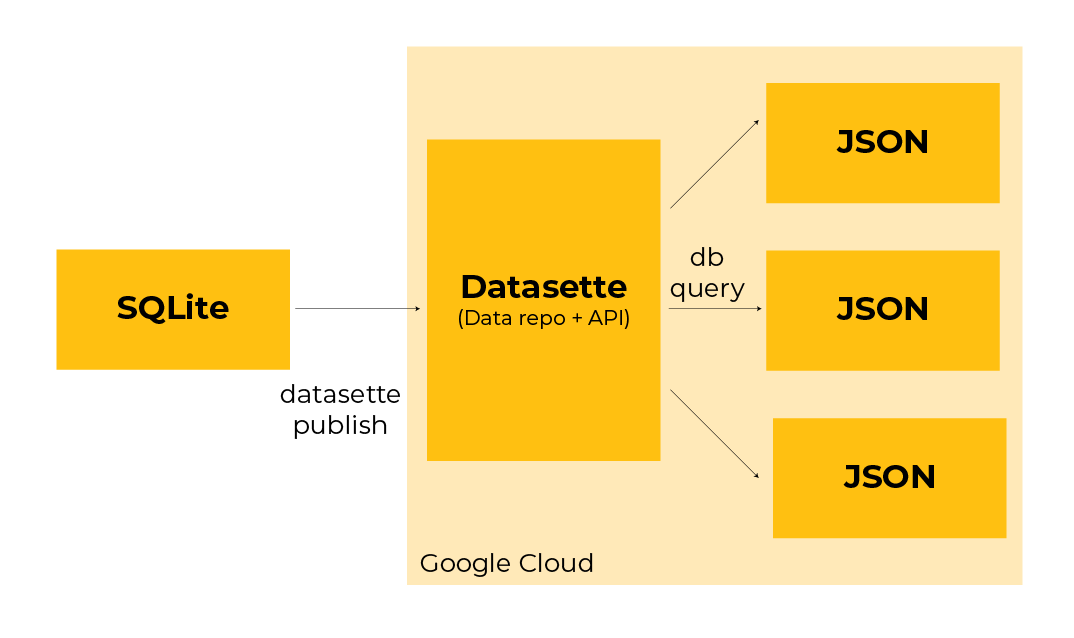
Publishing Datasette
For this setup to work with SvelteKit, Datasette must be hosted online so the site can request data from it. We hosted ours on Google Cloud Run, but the same approach works on AWS or any platform that can run Datasette. There are a number of options. Read more about publishing here.
Here is an example of a command to publish your Datasette to Google Cloud Run:
| $ datasette publish cloudrun election.db –service=election |
|---|
Updating data
Datasette is built directly on top of the SQLite database you created earlier. When the data changes in your spreadsheet, you follow the same workflow you did originally: export to CSV, convert to SQLite, then update the database and Datasette serves the new version without any extra wiring.
Datasette as API
This is the key to the entire workflow. Datasette doesn’t just show your data. It publishes your data as JSON, which SvelteKit can read and use directly.
Datasette lets you expose an entire table as JSON, or the results of a specific query. That turns Datasette into a practical API for serving exactly the slices of data your site needs.
Here’s how that works in practice.
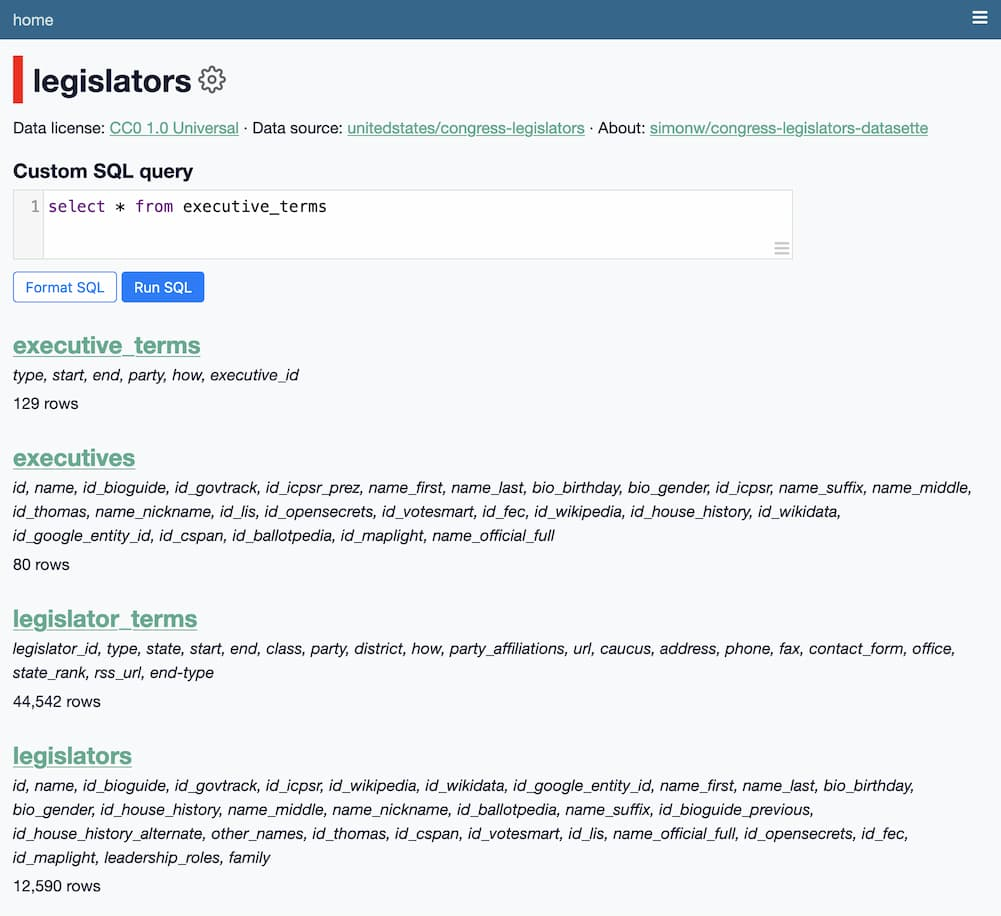
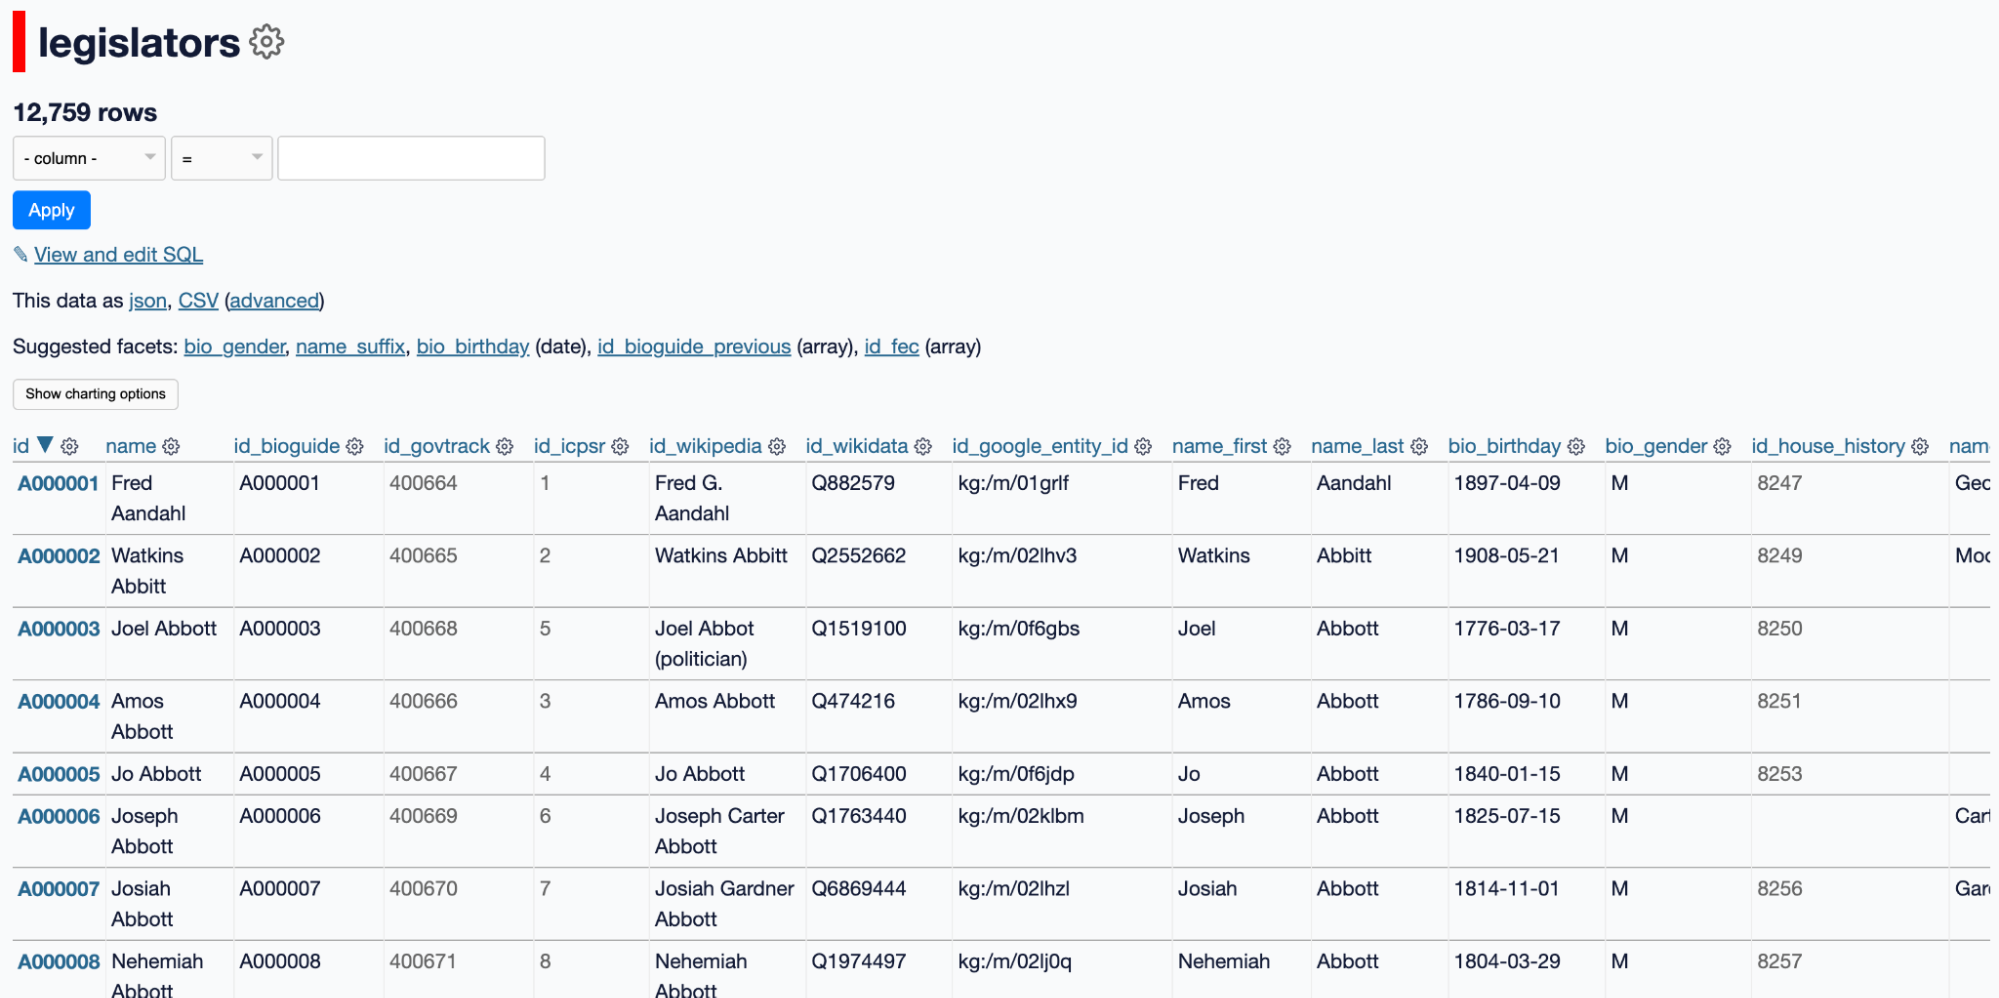
Here is a table called “legislators” from a datasette database:
 Now run a query against that table. For example, filter for legislators with the first name “Robert” and the last name “Smith.” Datasette returns only the matching rows. In this case, there are three results.
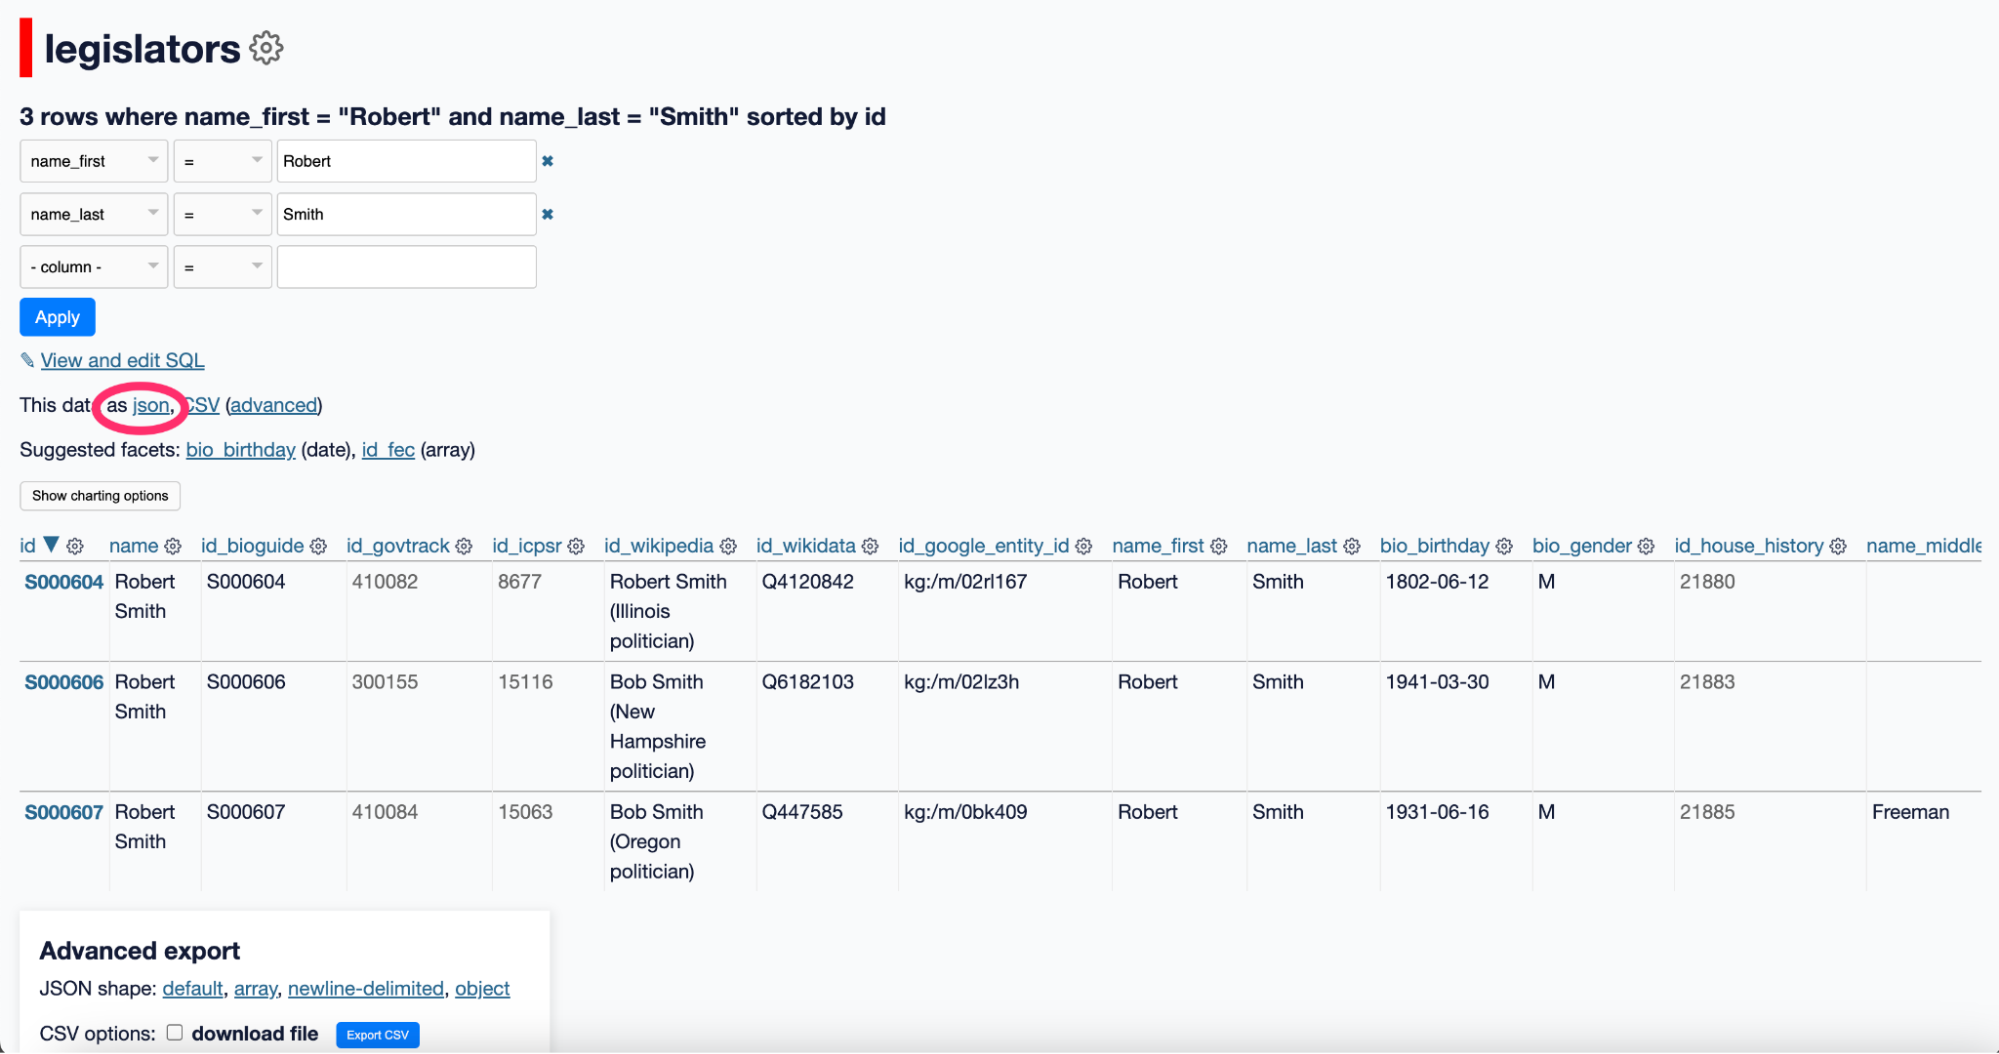
Once you have that result set, you can export it as JSON. Click the link labeled “This data as JSON” on the page. Datasette will return the query results in clean, structured JSON.
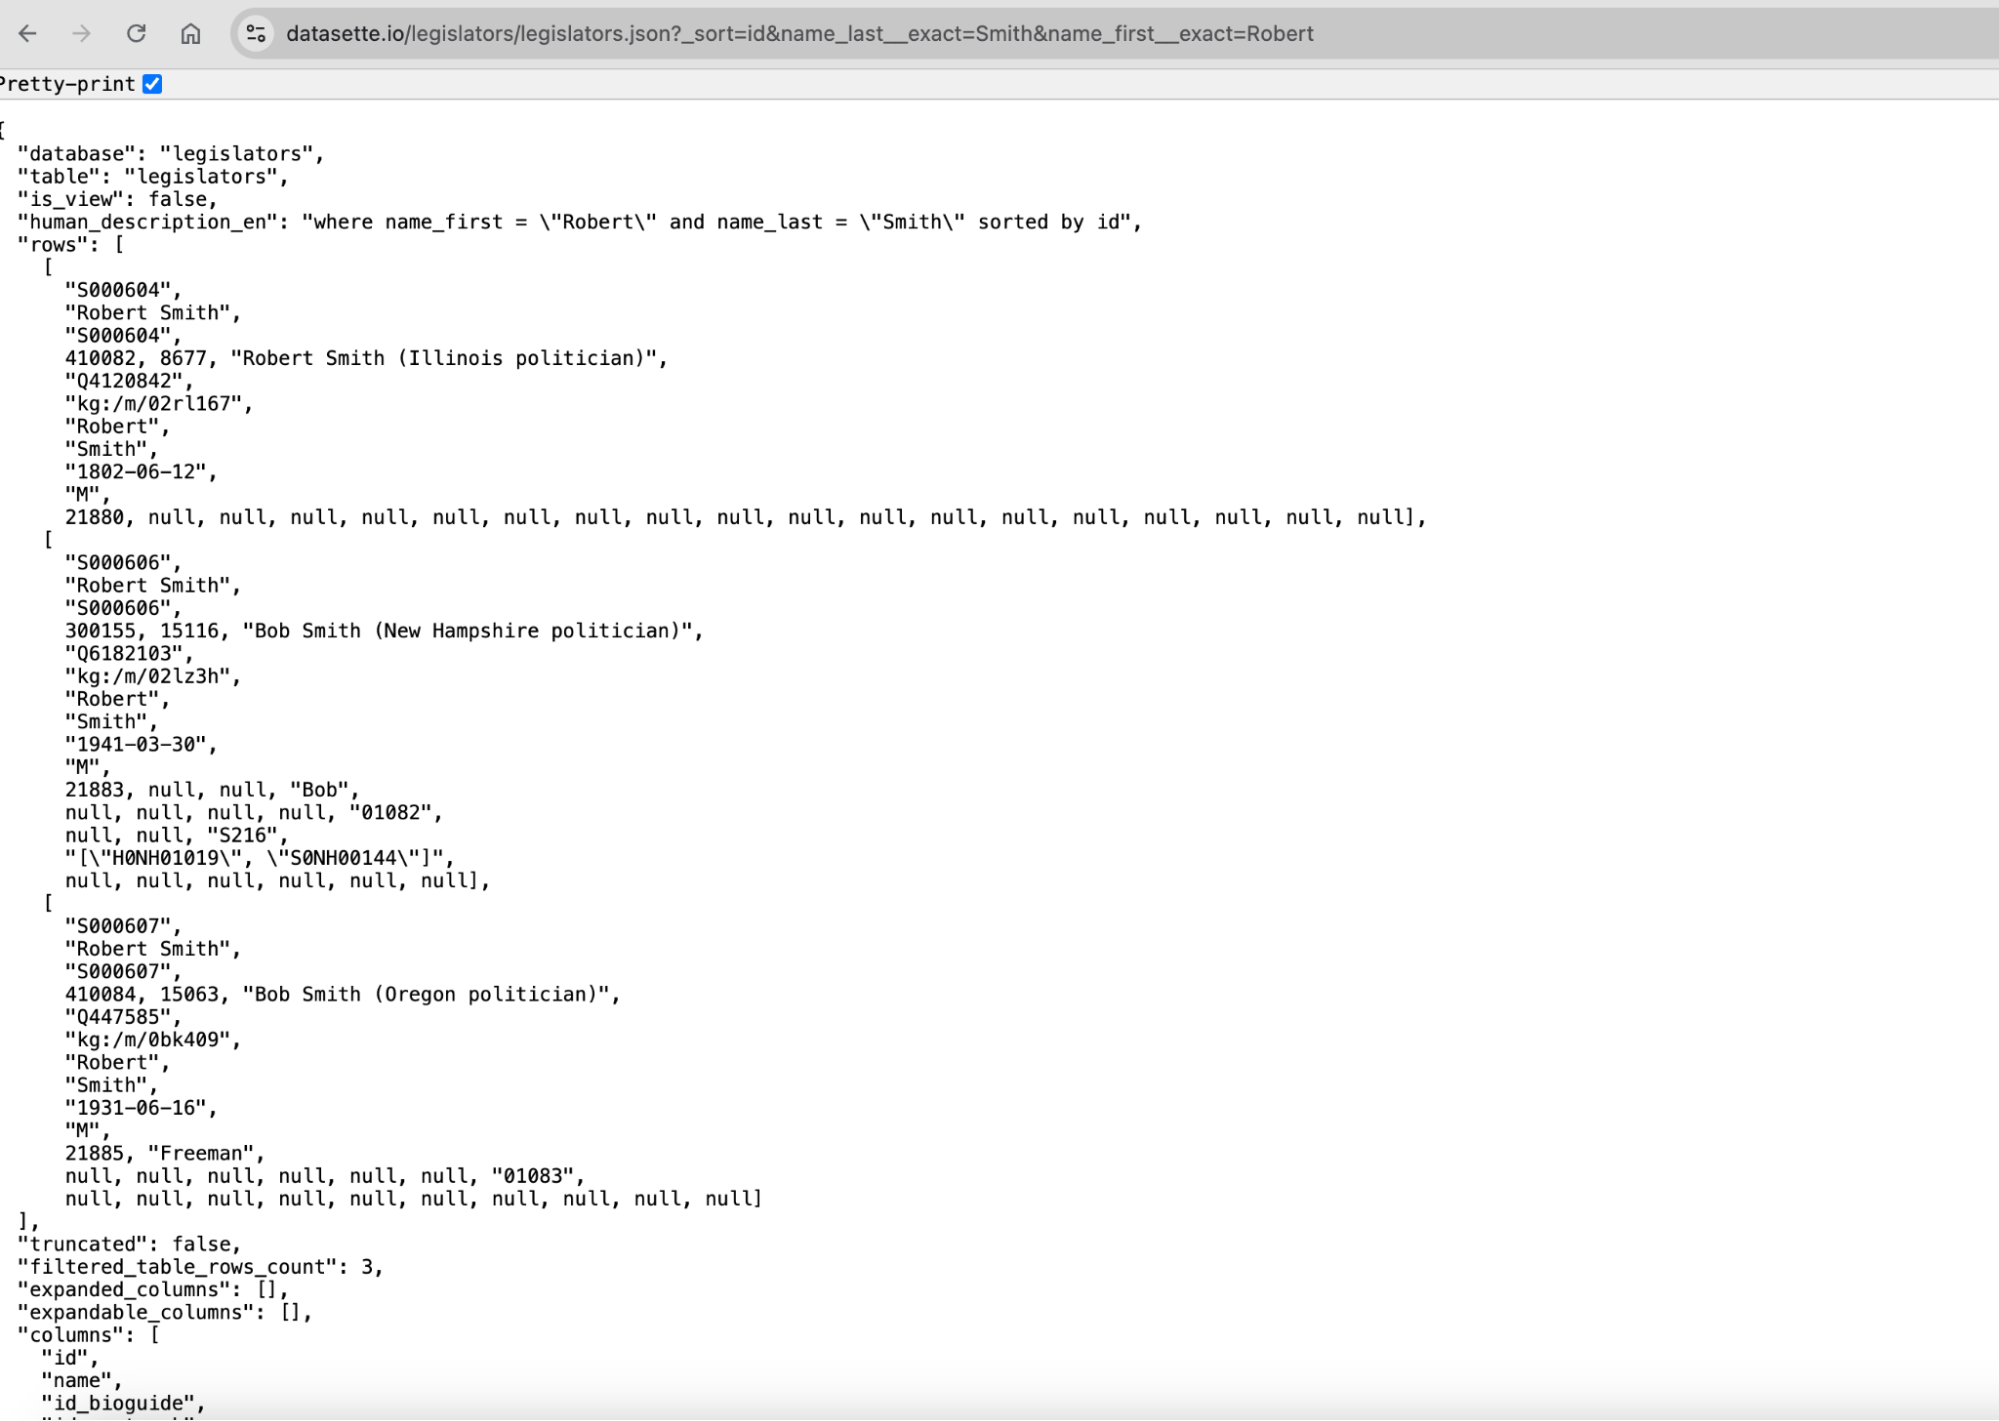 You now have a URL that points directly to those JSON results. For example:
This URL is what your SvelteKit app will request. When the page loads, SvelteKit fetches this URL and gets back the data it needs.
If you look closely at the URL, you’ll see the entire query embedded in the URL string. That’s incredibly useful. You can change filters, sorting, or limits just by changing the URL. No new endpoints. No backend code. You build new queries by constructing new URLs.
For all practical purposes, Datasette becomes your API layer. You store the data once, publish it once, and then pull exactly what you need into your web application.
SvelteKit
 What is SvelteKit?
SvelteKit is a modern web framework for building fast, data-driven websites. You write your code in SvelteKit and it outputs HTML pages.
In this workflow, SvelteKit is the layer that talks to Datasette. It requests JSON data, processes it, and outputs the pages your audience sees. Every race and candidate page is built this way.
SvelteKit is built on top of Svelte. The difference can be a little confusing. Think of it this way: Svelte is for creating interactive components. SvelteKit organizes those components into pages and handles data, navigation, and deployment.
Getting started
Getting started with SvelteKit is straightforward. You can scaffold a new project with a single command and have a working site in minutes. The framework gives you a clear file-based routing system, so the structure of your project matches the URLs on your site.
SvelteKit is built on top of Svelte, a component-based framework that compiles your code to small, efficient JavaScript. That means less overhead in the browser and faster load times for readers.
If you’ve worked with other frameworks, SvelteKit will feel familiar. If you haven’t, it’s still approachable. You don’t need to write a lot of boilerplate, and you don’t need to manage a separate backend for most projects.
Install SvelteKit:
You can get SvelteKit running in just a few steps. You don’t need anything beyond Node.js and a terminal.
Step 1: Install Node.js
Make sure you have Node.js version 18 or newer. npm comes with it. You can download it here:
https://nodejs.org/
Step 2: Create a new project
Run this command in your terminal:
| $ npm create svelte@latest my-app |
|---|
Replace “my-app” with the name you want for your project.
You’ll be asked a few questions. The defaults are fine if you’re just starting out.
Step 3: Install dependencies
Move into your project folder and install everything you need:
| $ cd my-app |
|---|
| $ npm install |
|---|
Step 4: Start the development server
Run this command to start the local server:
| $ npm run dev |
|---|
Open http://localhost:5173 in your browser. You’ll see your SvelteKit app running.
For more info, see the official SvelteKit documentation
The Svelte docs are helpful too if you’re new to components.
Once SvelteKit is set up, you’re ready to connect it to Datasette and start building pages with live data.
Routes in SvelteKit
Routes in SvelteKit are how your site’s URLs connect to pages. Each route corresponds to a file in the src/routes folder.
For example:
- src/routes/index.svelte → / (home page)
- src/routes/about.svelte → /about
- src/routes/candidates/[id].svelte → /candidates/123 (dynamic route)
Each route can have two parts:
- A page.svelte file, which defines how the page looks and behaves in the browser.
- A page.js (or .ts) file, which handles server-side tasks like fetching data before the page loads.
Dynamic routes let you show different content for different URLs using placeholders, like [id]. SvelteKit automatically passes the value in the URL to your page so you can fetch the right data.
Routes make navigation simple. You don’t have to configure them separately. Just create a file in src/routes, and SvelteKit handles the URL and page rendering for you.
Basically, a route is a URL tied to a page file.
How to pull it all together: Building the site
We will review a sample version of the voter guide during the training session. It is a simplified version of the 2024 Maryland school board election guide.
The code for the site we are reviewing is available in this GitHub repository. You are welcome to use this code. But be aware that our specific Datasette API calls have been stripped out.
Our site has three pages:
A homepage where you select the school district
A district page where you select the candidate
A candidate page
Most of the site is pretty standard and built on top of the SvelteKit boilerplate template. We will focus on reviewing the specific parts of the site / code blocks that interact with Datasette and display our candidate information.
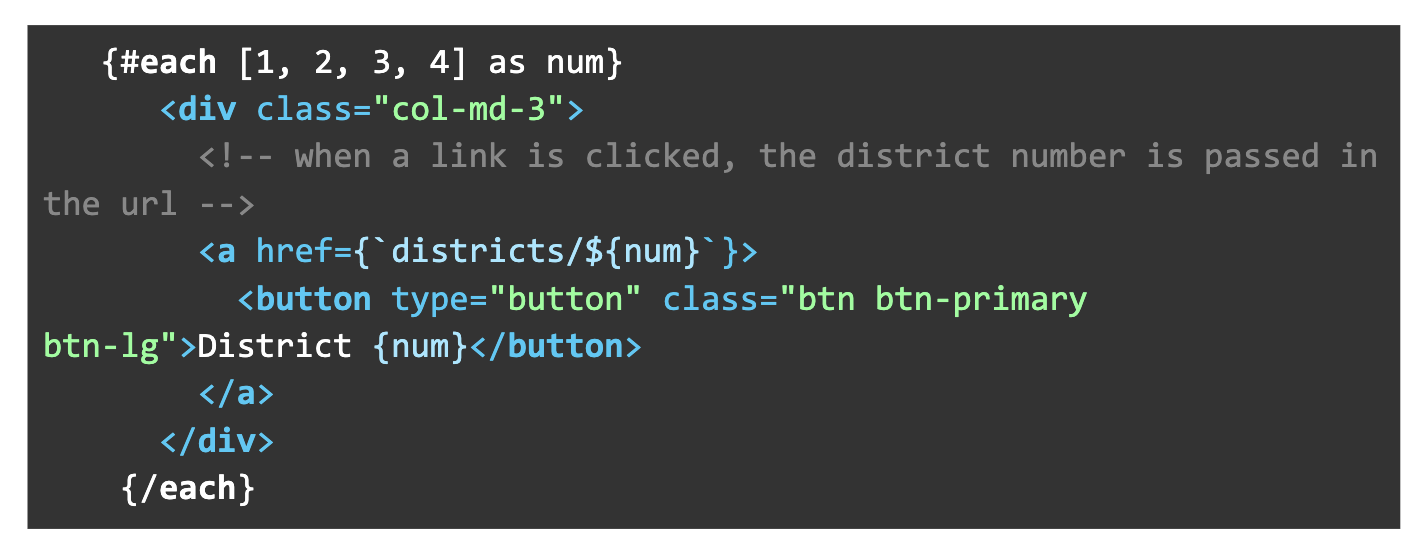
Homepage:
routes/page.svelte
Our homepage is really simple:
- A simple #each loop makes our buttons for each district (in this case, for 1, 2, 3, 4)
- When the button is clicked, it passes the district number as a variable in the URL to the districts page:
<a href={`districts/${num}`}>
That is pretty much it. The buttons could be hardcoded also if you have a more complex election, but the loop makes it nice and simple.
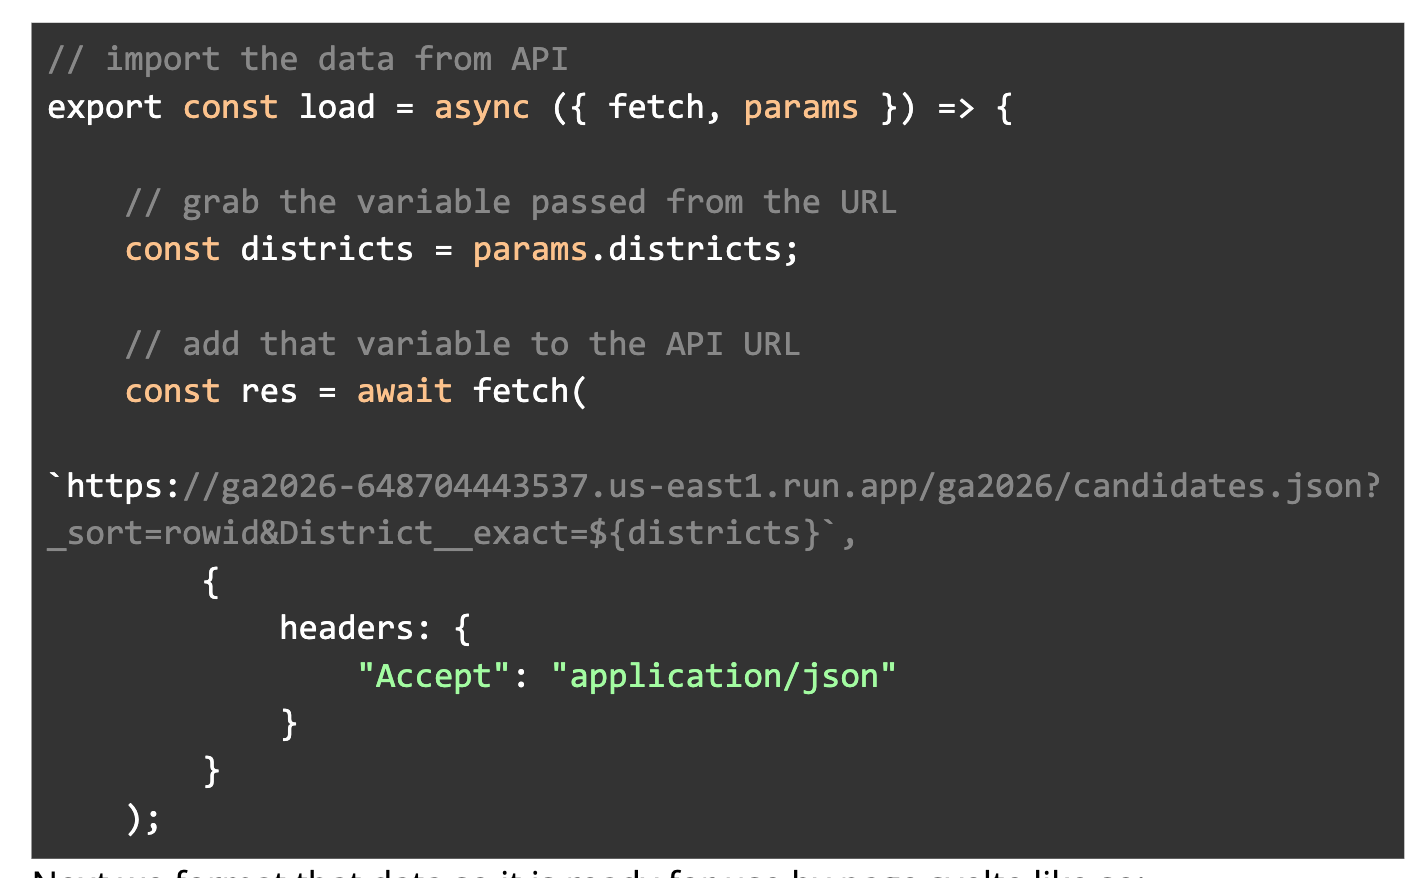
Districts Page:
routes/districts/page.svelte
routes/districts/page.js
The compiled HTML page consists of 2 files in sveltekit (as described in routes above): page.svelte, which is the layout, and page.js, which handles the server-side tasks.
- The page.js file grabs the district number from the url via params and puts it into a variable called “districts”
- Then it queries Datasette via a URL
- The {districts} variable is tacked onto the end of the URL query
- The URL is set up to pull in the results via JSON
Next we format that data so it is ready for use by page.svelte like so:
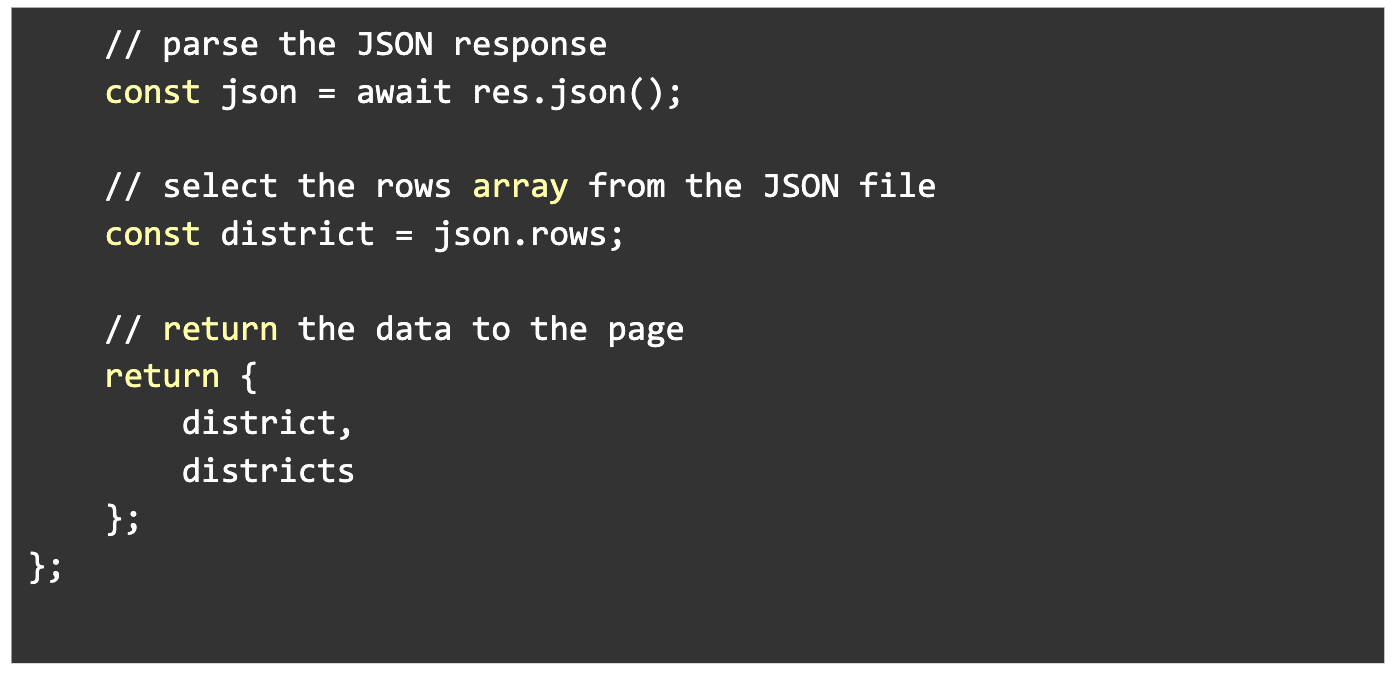 On page.svelte, we are using that returned data to display all of the candidates in that district, and link to their candidate page.
Here, we are writing a loop to display all the candidates who answered our survey:
 We write a conditional statement only display candidates who answered our survey (the 6th row of our data): #if thisDistrict[5] === ‘y’
- {thisDistrict[4]} displays the candidate name (the 5th row of the data)
- <a href={`/candidates/${thisDistrict[0]}`} formats a URL that sends the candidate’s unique ID number to the candidates page (the first row of data)
There is another loop below this one that shows candidates that didn’t answer in a different style and omits the link.
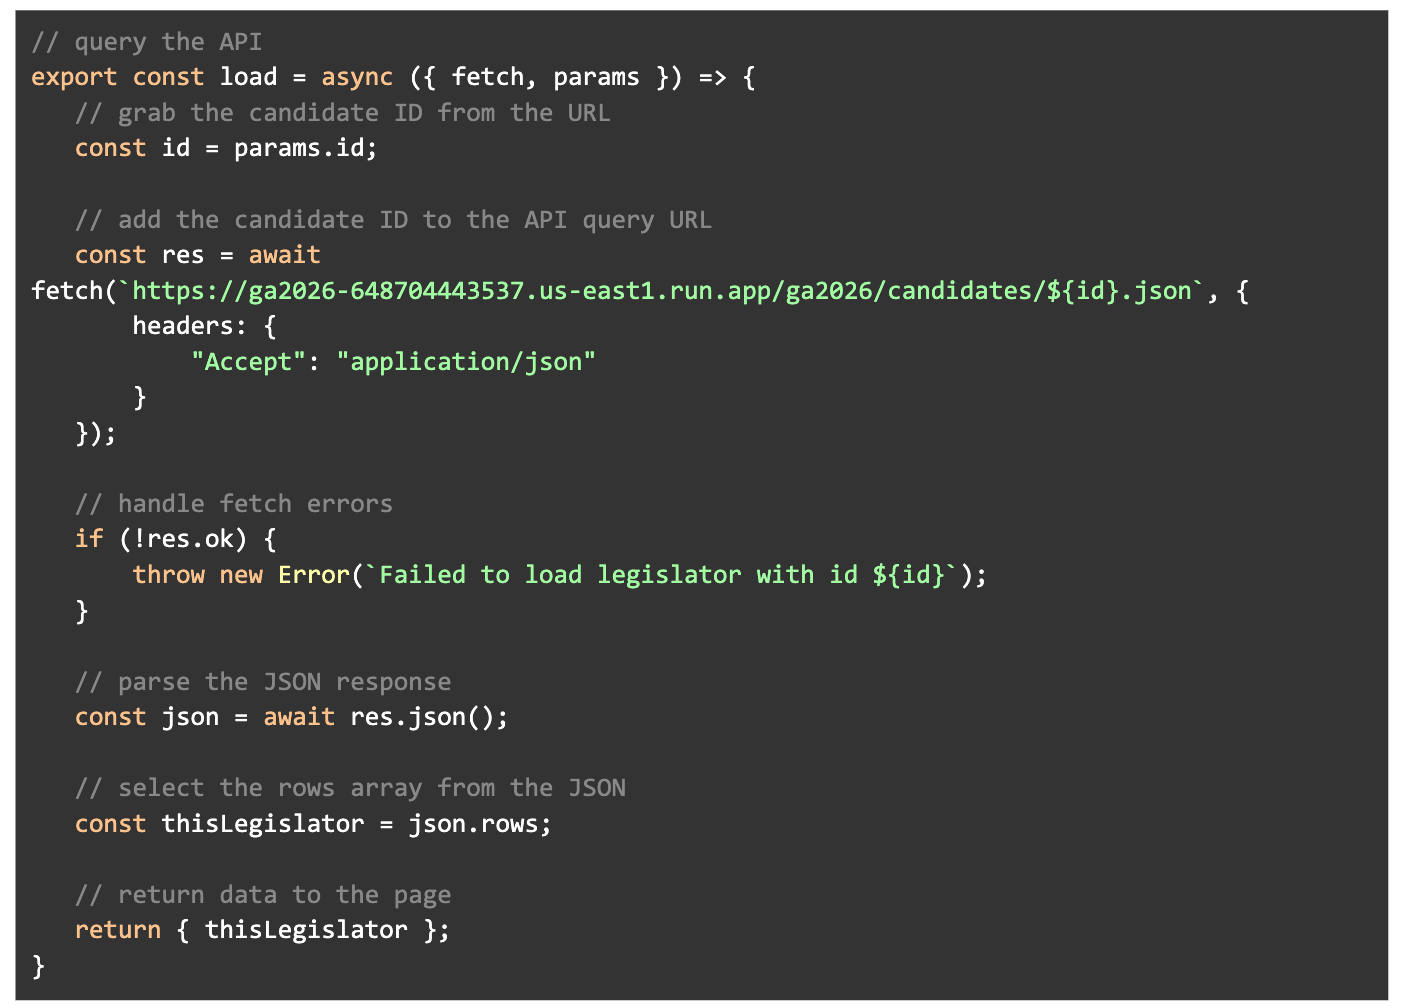
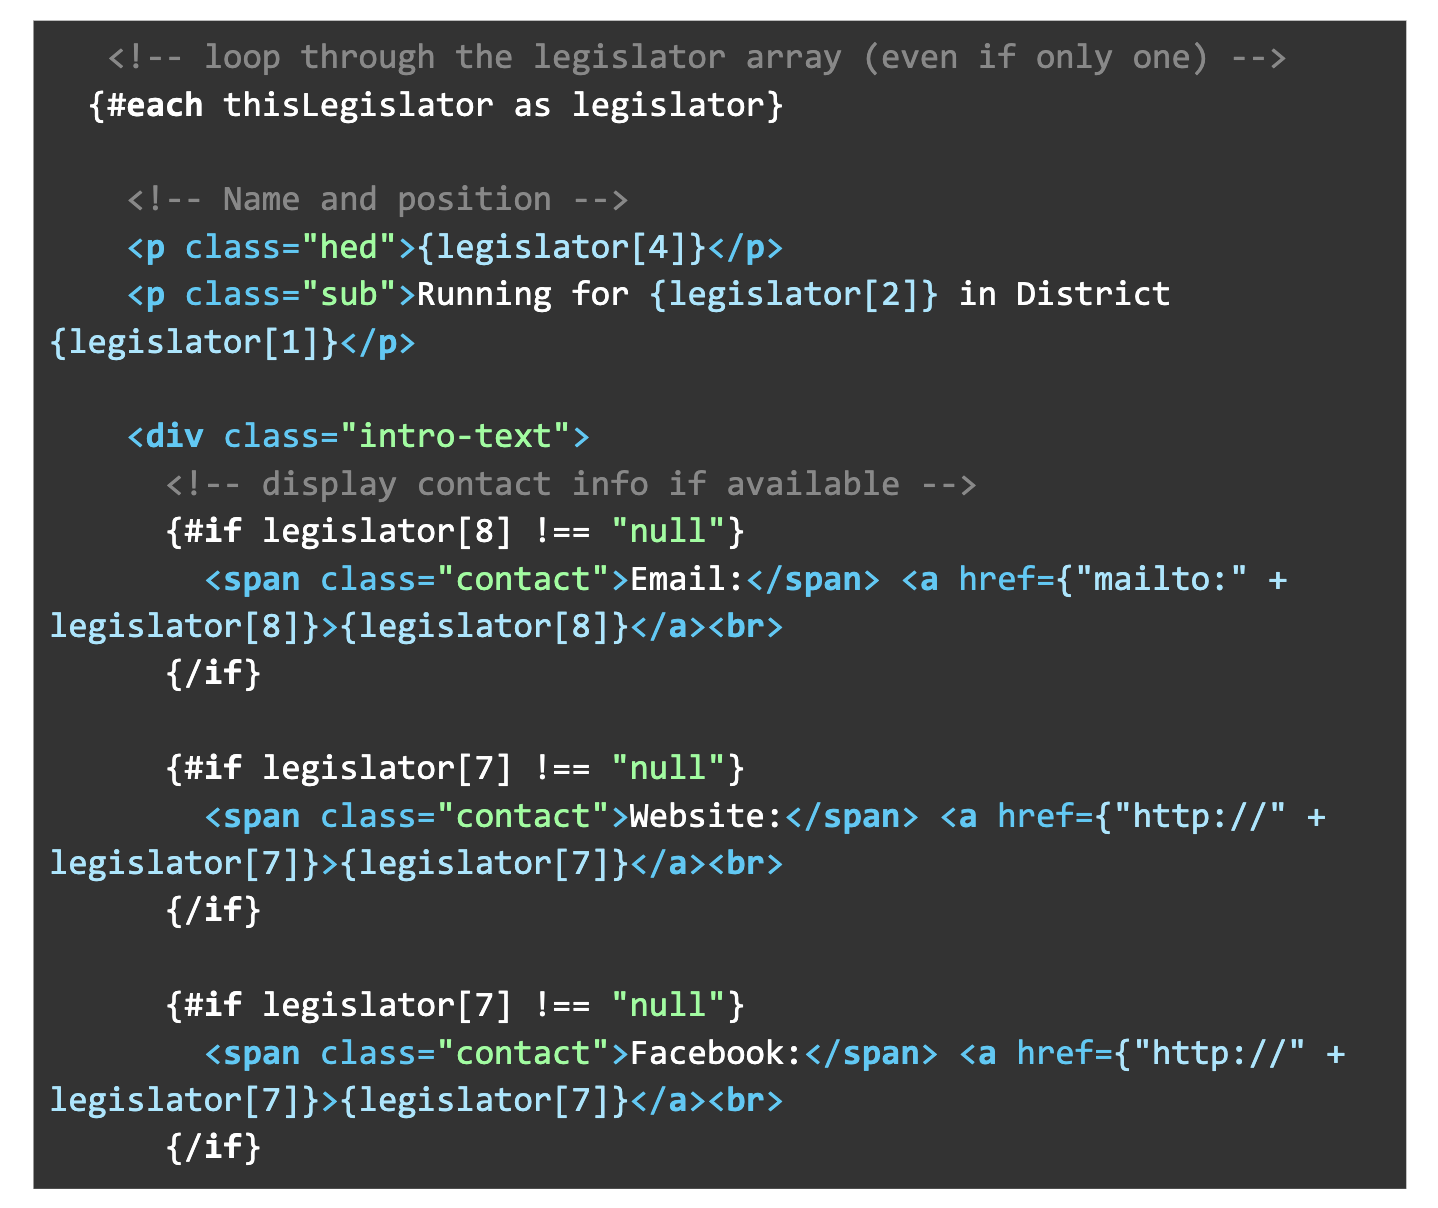
Candidate Page:
routes/candidate/page.svelte
routes/candidate/page.js
The candidate page works very similar to the districts page.
The page.js works exactly as the page above:
- Grab the ID number from the URL via param
- Query Datasette by adding the {id} to a url formatted to return JSON
- Prep the data for use by page.svelte
 Page.svelte also works very similarly to the district page. We grab the data formatted by page.js and display it:
- We loop through the data with #each (even though there is only one result)
- Conditional statements check for null values. If a value is null, that section isn’t shown: {#if legislator[8] !== “null”}
- Insert text about the candidate on the page from the database in the appropriate spots. For instance, Running for {legislator[2]} in District {legislator[1]}</p> adds the race (3rd row in the data) and district (2nd row) in the proper place.
And that’s it. We allow users to select the district and candidates, then show them info about the candidates to help them make an informed decision about who to vote for. Public service journalism in action!
Wrapping up
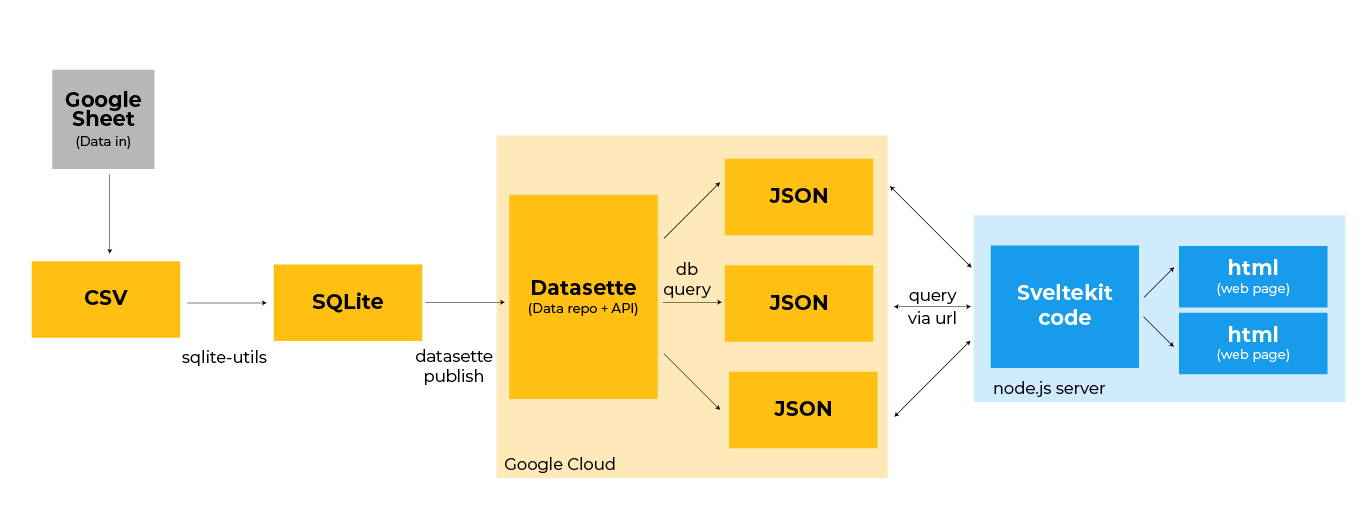
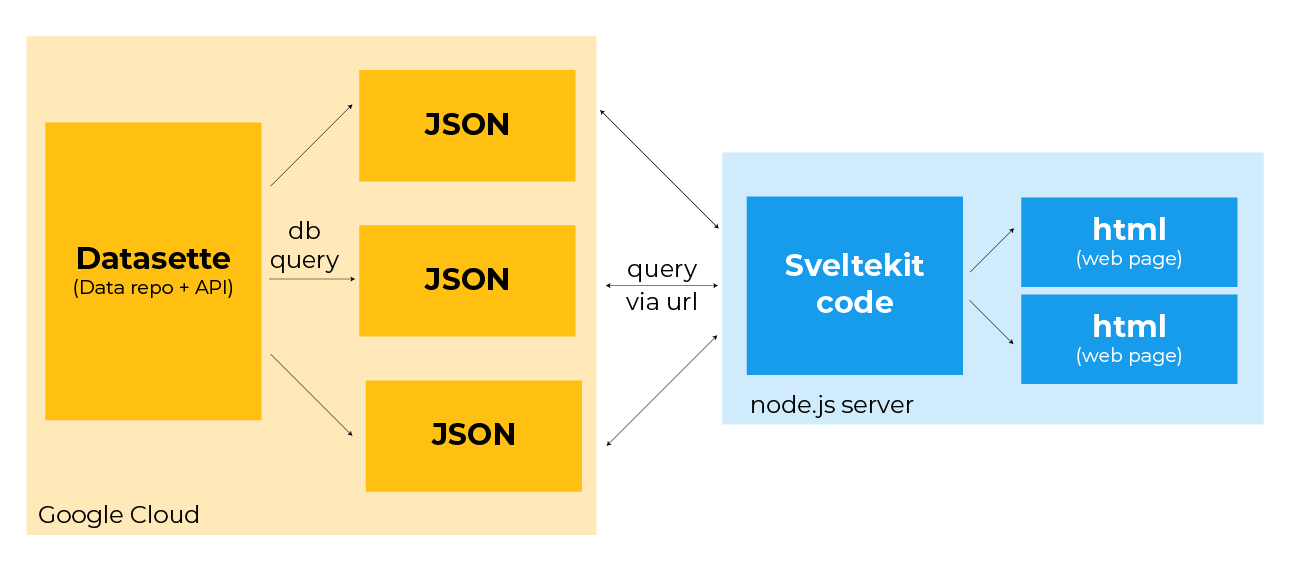
This diagram above shows the entire workflow, from start to finish.
You can see this in action at the 2024 Maryland school board election guide.
You can download the code from the NICAR 2026 demo here. Feel free to use the code for your own projects, but please be sure to change the frontend design and styling.
Note about the code: The Datasette API links have been removed, but the test data I used is available in the “test-db” folder so you can set up and host your own database if you choose.
This document was written by Adam Marton for NICAR 2026, with a little help from Claude.